Introduction
Solarization is a process used in Photography to describe the effect of tone reversal observed in cases of extreme overexposure of the photographic film in the camera. It is a darkroom technique to convert any photograph to look graphic or surrealistic. It often occurs when a very intense light source appears in the picture and is grossly overexposed. It is a technique where the image is partially or completely reversed (inverted) by an extreme overexposure. Original Source - here. With this blog, let's understand the same in a more Pythonic way.
Credits of Cover Image - Photo by engin akyurt on Unsplash
When we are solarizing an image, we mainly consider a threshold pixel value in order to reverse (invert) the image partially or completely. To know more about inverting an image, you can refer to my article here.
We will rely on the PIL library to solarize the image. We will also code the same without using the PIL module and by just using NumPy for the matrix operations.
Time to Code
The packages that we mainly use are:
- NumPy
- Matplotlib
- OpenCV
- PIL

import the Packages
import numpy as np
import cv2
import json

from PIL import Image
from PIL import ImageOps as ipo

from matplotlib import pyplot as plt
Code Implementation with Library
We use the method solarize() available in the module ImageOps - part of the main module PIL. The method takes the following arguments -
image→ image file that needs to solarized.threshold→ threshold value to either partially or completely reverse (invert) the image.
Now that we have all the requirements, let's write the function that solarizes the image.
def solarize_lib(image_file, thresh_val, gray_scale=False):
    image_src = Image.open(image_file)
    image_src = image_src.convert('L') if gray_scale else image_src

    image_sol = ipo.solarize(image_src, threshold=thresh_val)

    cmap_val = None if not gray_scale else 'gray'
    fig, (ax1, ax2) = plt.subplots(nrows=1, ncols=2, figsize=(10, 20))

    ax1.axis("off")
    ax1.title.set_text('Original')

    ax2.axis("off")
    ax2.title.set_text("Solarized")

    ax1.imshow(image_src, cmap=cmap_val)
    ax2.imshow(image_sol, cmap=cmap_val)
    return True
The above function solarizes the images that are read both in colored mode or grayscale mode. Let's test the same.
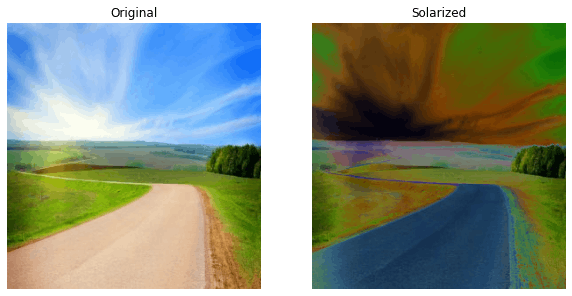
solarize_lib(image_file='scenary.jpg', thresh_val=130)
For RGB image

For grayscale image

Above are the results of the images that are solarized.
Code Implementation from Scratch
For coding from scratch, we are relying on the NumPy module since matrix operations can be achieved with so much ease. We will need to validate for both colored images as well as grayscale images.
Read the Image
def read_this(image_file, gray_scale=False):
    image_src = cv2.imread(image_file)
    if gray_scale:
        image_src = cv2.cvtColor(image_src, cv2.COLOR_BGR2GRAY)
    else:
        image_src = cv2.cvtColor(image_src, cv2.COLOR_BGR2RGB)
    return image_src
The above function reads the image either in grayscale or RGB and returns the image matrix.
As above we will have a thresh_val argument based on which the partial or complete reversing (inverting) be done.
def solarize_this(image_file, thresh_val, with_plot=False, gray_scale=False):
    image_src = read_this(image_file=image_file, gray_scale=gray_scale)

    if not gray_scale:
        r_image, g_image, b_image = image_src[:, :, 0], image_src[:, :, 1], image_src[:, :, 2]
        ## inverting the colored image (partially)
        r_sol = np.where((r_image < thresh_val), r_image, ~r_image)
        g_sol = np.where((g_image < thresh_val), g_image, ~g_image)
        b_sol = np.where((b_image < thresh_val), b_image, ~b_image)
        image_sol = np.dstack(tup=(r_sol, g_sol, b_sol))
    else:
        ## inverting the grayscale image (partially)
        image_sol = np.where((image_src < thresh_val), image_src, ~image_src)

    if with_plot:
        cmap_val = None if not gray_scale else 'gray'
        fig, (ax1, ax2) = plt.subplots(nrows=1, ncols=2, figsize=(10, 20))

        ax1.axis("off")
        ax1.title.set_text('Original')

        ax2.axis("off")
        ax2.title.set_text("Solarized")

        ax1.imshow(image_src, cmap=cmap_val)
        ax2.imshow(image_sol, cmap=cmap_val)
        return True
    return image_sol
We are using the where() method of NumPy to find out those pixels which are less than thresh_val and inverting the same which are greater. Let's test the function.
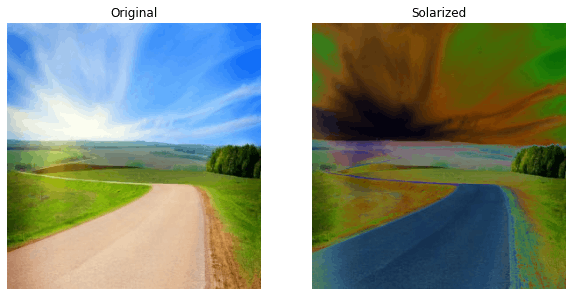
For RGB image
solarize_this(
    image_file='scenary.jpg',
    thresh_val=130,
    with_plot=True
)

For grayscale image
solarize_this(
    image_file='lena_original.png',
    thresh_val=120,
    with_plot=True,
    gray_scale=True
)

PIL is a great library and so is NumPy. PIL is easy to use and the results can be obtained with less code. It is great for researchers and beginners. Implementing the same from scratch is what I have gained.
Here I take leave. If you have liked it consider visiting this page to read more on Image Processing. And make sure to buy coffee for me from here.