Introduction
In this article, we will learn how to invert an image using NumPy. To get some gist of this, let’s have two values 0 and 1. Here 0 represents Black and 1 represents White. When we apply inversion to these values, we get:
- 0 → inverted → 1
- 1 → inverted → 0
The above only works when we have two values. 0 for low and 1 for high. If we were to relate the same with the Binary Image whose pixel values are just 1’s and 0's. The inversion would be reversed. To put it in words we can say from White and Black to Black and White.
Credits of Cover Image - Photo by Jr Korpa on Unsplash
Broadcasting
Unlike lists, if we want to add a number to the values of the list. We iterate through each element and add the number. Whereas, in NumPy, we need not iterate through each element and add. Instead, we can treat the array list as a single element and add the number. NumPy automatically adds that number to all the elements of the array list. This technique is called broadcasting.
The broadcasting technique is applicable to both matrices and arrays. It is very fast when compared to normal loops.
>>> import numpy as np
>>> M = np.array([1, 2, 3, 4, 5, 6])
>>> M = 3 + M
>>> M
array([4, 5, 6, 7, 8, 9])
>>>
Let’s see the demonstration for a random matrix.
White — Black
A simple demonstration of the White — Black matrix and the image can be seen below.
- 1 is visualized as White
- 0 is visualized as Black
>>> import numpy as np
>>> image_b = np.array([
...     [1,0,1],
...     [1,1,0],
...     [0,1,1]])
>>> image_b
array([[1, 0, 1],
       [1, 1, 0],
       [0, 1, 1]])
>>>
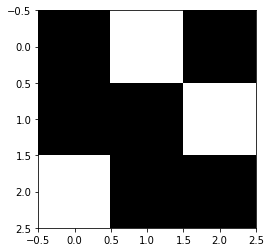
If we visualize the above matrix, we can see something like the below.

Black — White
A simple demonstration of the Black — White matrix and the image can be seen below.
- 1 is changed to 0 → Black
- 0 is changed to 1 → White
>>> # Broadcasting
>>> image_i = 1 - image_b
>>> # image_i = ~ image_b
>>> image_i
array([[0, 1, 0],
       [0, 0, 1],
       [1, 0, 0]])
>>>
If we visualize the above matrix, we can see something like the below.

To convert a matrix into an inverted matrix we can also use the operation ‘~'. It works in the same way.
If you want to know specifically how to convert an image into binary, you can refer to my article where I explain the procedure for both colored and grayscale images.
The above implementation worked since the images are already binarized. What if we wanted to apply this for a colored and non-binarized image? The scenarios will be different. Let’s find out what we can do for those.
Time to Code
The packages that we mainly use are:
- NumPy
- Matplotlib
- OpenCV

Import the Packages
import numpy as np
import cv2
import json
from matplotlib import pyplot as plt
Read the Image
def read_this(image_file, gray_scale=False):
    image_src = cv2.imread(image_file)
    if gray_scale:
        image_src = cv2.cvtColor(image_src, cv2.COLOR_BGR2GRAY)
    else:
        image_src = cv2.cvtColor(image_src, cv2.COLOR_BGR2RGB)
    return image_src
The above function reads the image either in grayscale or RGB and returns the image matrix.
Code Implementation with Library
For inverting an image using the cv2 library, we can use the method bitwise_not() which is available in the library. We can just pass the image matrix as an argument in the method.
def invert_lib(image_file, with_plot=False, gray_scale=False):
    image_src = read_this(image_file=image_file, gray_scale=gray_scale)
    cmap_val = None if not gray_scale else 'gray'
    image_i = cv2.bitwise_not(image_src)

    if with_plot:
        fig, (ax1, ax2) = plt.subplots(nrows=1, ncols=2, figsize=(10, 20))

        ax1.axis("off")
        ax1.title.set_text('Original')

        ax2.axis("off")
        ax2.title.set_text("Inverted")

        ax1.imshow(image_src, cmap=cmap_val)
        ax2.imshow(image_i, cmap=cmap_val)
        return True
    return image_i
The above function returns the inverted image of the original image that is passed. The same can be seen when plotted.
Let’s test the above function —
invert_lib(image_file='lena_original.png', with_plot=True)

invert_lib(image_file='lena_original.png', with_plot=True, gray_scale=True)

We have obtained the inverted images for both colored and grayscale images.
Code Implementation from Scratch
In order to invert the image, we have to apply the broadcasting technique using NumPy. We have to subtract each pixel value from 255. It is because the highest pixel value or color value is 255 in an image. Either way, we can apply the ‘~’ (negation) operation to the image.
def invert_this(image_file, with_plot=False, gray_scale=False):
    image_src = read_this(image_file=image_file, gray_scale=gray_scale)
    # image_i = ~ image_src
    image_i = 255 - image_src

    if with_plot:
        cmap_val = None if not gray_scale else 'gray'
        fig, (ax1, ax2) = plt.subplots(nrows=1, ncols=2, figsize=(10, 20))

        ax1.axis("off")
        ax1.title.set_text('Original')

        ax2.axis("off")
        ax2.title.set_text("Inverted")

        ax1.imshow(image_src, cmap=cmap_val)
        ax2.imshow(image_i, cmap=cmap_val)
        return True
    return image_i
Let’s test the above function —
invert_this(image_file='lena_original.png', with_plot=True)

invert_this(image_file='lena_original.png', with_plot=True, gray_scale=True)

This is it! We have successfully written the code for converting the image into an inverted image. The results are similar to that of the library code.
Let’s see what will it result in when applied to the binarized image. I have put the result without the code.

The inverted image is exactly opposite to the binarized image. Hence this concludes the agenda of this article.
You should definitely check out my other articles on the same subject in my profile.
If you liked it, you can buy coffee for me from here.
