

Introduction
Erosion operation is one of the important morphological operations (morphological transformations) that follows a technique of mathematical morphology for the analysis and processing of geometrical structures.
To get a general idea of what erosion has to do with images, we can think of this as an operation in which it tries to reduce the shape that is contained in the input image. It is just like the erosion of soil but just that this operation erodes the boundaries of the foreground object.
Credits of Cover Image - Photo by Laura Colquitt on Unsplash
To represent this operation mathematically -
$$A \circleddash B$$
where -
A→ Input ImageB→ Structuring element or kernel
The resultant of the above formula gives the eroded image. The structuring element is basically a kernel where the image matrix is operated as a 2D convolution.
Note - This blog post covers the erosion process done on binary images. Also, it is often preferred to use binary images for morphological transformation.
Concept of Erosion
As discussed, we only use the binary images that consist of pixels either 0 or 1 (0 or 255 to be more precise). The structuring element or kernel is either a subset of the image matrix or not which also, is a binary representation that is mostly a square matrix.
Let us consider A as the image matrix and B as the kernel. We have conditions as follows:
We have to position the center element of
Bto the element iteratively taken in the imageA.We consider the submatrix of
Ato be the sizeBand check if the submatrix is exactly equivalent toB.If yes, replace the pixel value to be
1or255otherwise0.
We need to do this for all the elements of A with B.
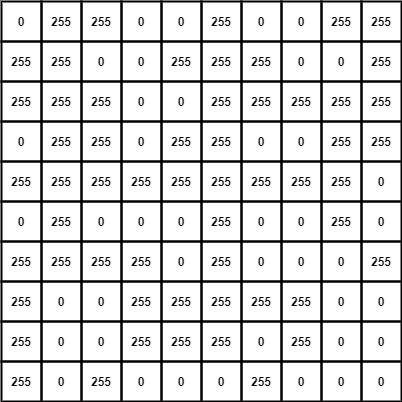
Imagine the image matrix A as -
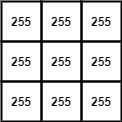
and structuring element or kernel B as -
The binary image of the matrix A would be something like below.

For easy calculation, we shall pad the image by a pad_width equal to (kernel size - 2) with which the submatrix can be selected easily. The GIF can be seen below to visually know the inner working of the convolution.
Now that we know what to do, let's code the same using the library as well as from scratch.
Time to Code
The packages that we mainly use are:
- NumPy
- Matplotlib
- OpenCV → It is only used for reading the image (in this article).

import the Packages
import numpy as np
import cv2
import json
from matplotlib import pyplot as plt
Read the Image
Since we do the morphological transformations on binary images, we shall make sure whatever image we read is binarized. Therefore, we have the following function.
def read_this(image_file):
    image_src = cv2.imread(image_file, 0)
    return image_src

def convert_binary(image_src, thresh_val):
    color_1 = 255
    color_2 = 0
    initial_conv = np.where((image_src <= thresh_val), image_src, color_1)
    final_conv = np.where((initial_conv > thresh_val), initial_conv, color_2)
    return final_conv

def binarize_this(image_file, thresh_val=127):
    image_src = read_this(image_file=image_file)
    image_b = convert_binary(image_src=image_src, thresh_val=thresh_val)
    return image_b
Note - By default we are reading the image in grayscale mode.
Code Implementation with Library
For this, we will be using a different image, and for the implementation, we will use the method erode() available in the module cv2. The parameters are as follows:
image_file → The image that we want to apply the transformation.
level → Basically the
erosionlevel with which thestructuring elementorkernel's size is decided.with_plot → To obtain the results of both the original image and the transformed image.
def erode_lib(image_file, level=3, with_plot=True):
    level = 3 if level < 3 else level
    image_src = binarize_this(image_file=image_file)
    # library method
    image_eroded = cv2.erode(src=image_src, kernel=np.ones((level, level)), iterations=1)

    if with_plot:
        cmap_val = 'gray'
        fig, (ax1, ax2) = plt.subplots(nrows=1, ncols=2, figsize=(10, 20))

        ax1.axis("off")
        ax1.title.set_text('Original')

        ax2.axis("off")
        ax2.title.set_text("Eroded - {}".format(level))

        ax1.imshow(image_src, cmap=cmap_val)
        ax2.imshow(image_eroded, cmap=cmap_val)
        plt.show()
        return True
    return image_eroded
Let's test the above function -
erode_lib(image_file='wish.jpg', level=3, with_plot=True)

Clearly, we can see the some of the pixels got reduced showing the pixel erosion.
Code Implementation from Scratch
As explained earlier, we need to carefully choose the pad_width depending upon the erosion_level. We normally take (kernel size - 2) or (erosion_level - 2) and here, the kernel is always square matrix.
After this, we shall also take the submatrices to position the center element of the kernel with each element of the image matrix iteratively. We make sure that the submatrix size is equal to kernel size. Hence we first pad the matrix with pad_width.
Let's code the erosion function from scratch.
def erode_this(image_file, erosion_level=3, with_plot=False):
    erosion_level = 3 if erosion_level < 3 else erosion_level

    structuring_kernel = np.full(shape=(erosion_level, erosion_level), fill_value=255)
    image_src = binarize_this(image_file=image_file)

    orig_shape = image_src.shape
    pad_width = erosion_level - 2

    # pad the matrix with `pad_width`
    image_pad = np.pad(array=image_src, pad_width=pad_width, mode='constant')
    pimg_shape = image_pad.shape
    h_reduce, w_reduce = (pimg_shape[0] - orig_shape[0]), (pimg_shape[1] - orig_shape[1])

    # sub matrices of kernel size
    flat_submatrices = np.array([
        image_pad[i:(i + erosion_level), j:(j + erosion_level)]
        for i in range(pimg_shape[0] - h_reduce) for j in range(pimg_shape[1] - w_reduce)
    ])

    # condition to replace the values - if the kernel equal to submatrix then 255 else 0
    image_erode = np.array([255 if (i == structuring_kernel).all() else 0 for i in flat_submatrices])
    image_erode = image_erode.reshape(orig_shape)

    if with_plot:
        cmap_val = 'gray'
        fig, (ax1, ax2) = plt.subplots(nrows=1, ncols=2, figsize=(10, 20))

        ax1.axis("off")
        ax1.title.set_text('Original')

        ax2.axis("off")
        ax2.title.set_text("Eroded - {}".format(erosion_level))

        ax1.imshow(image_src, cmap=cmap_val)
        ax2.imshow(image_erode, cmap=cmap_val)
        plt.show()
        return True
    return image_erode
Let's test the above function -
erode_this(image_file='wish.jpg', erosion_level=3, with_plot=True)

Clearly, we can see the reduction in the pixel values showcasing the pixel erosion. This, we implemented by convolution 2D technique totally from scratch. When compared to the speed of the algorithm, it is a bit slow compared to that of the library method.
References
- Morphological Transformations official documentation.