


Introduction
In this blog article, I will explain how we can mirror or flip an image in Python. All it is required is understanding the basic mathematics behind various matrix operations and matrix manipulations.
Credits of Cover Image - Photo by Michael Busch on Unsplash
Package requirements
- NumPy - For matrix operations and manipulating the same.
- OpenCV - For reading the image and converting it into a 2D array (matrix).
- Matplotlib - For plotting the matrix as an image.
For this mini-project, I am using a famous Lena image which is mainly used for testing the computer vision models. Make sure to download this image and save it in the current working directory.
import cv2
import numpy as np
from matplotlib import pyplot as plt
Let's get started
First, we read the image file using the imread() method from the module cv2. To do that, we simply need to import the package and use so. Hence by doing this, we get the image in the form of a matrix.
By default, imread() method reads the image in BGR (Blue, Green, Red) format. To convert the read image into regular format i.e., RGB (Red, Green, Blue) we use cvtColor() method from the same module cv2.
def read_this(image_file, gray_scale=False):
    image_src = cv2.imread(image_file)
    if gray_scale:
        image_rgb = cv2.cvtColor(image_src, cv2.COLOR_BGR2GRAY)
    else:
        image_rgb = cv2.cvtColor(image_src, cv2.COLOR_BGR2RGB)
    return image_rgb
The above function returns an image matrix from the image file that is passed. It consists of regular if and else condition if we want to get the image matrix either in gray_scale or RGB format.
Mirroring the Image
To mirror the image basically, we need to reverse the matrix row-wise from left to right. For example, let's consider a matrix A.
>>> A = [
       [4, 1, 1],
       [2, 8, 0],
       [3, 8, 1]
]
If we want to mirror this matrix (row-wise), then it would be -
>>> import numpy as np
>>> mirror_ = np.fliplr(A)
>>> mirror_
[[1, 1, 4],
 [0, 8, 2],
 [1, 8, 3]]
We can also do this without using the NumPy module. If so, we get to use loops and reverse each row. This would take a while if performed the same on image matrices as they are very large matrices and we don't want our code to perform very slow.
def mirror_this(image_file, gray_scale=False, with_plot=False):
    image_rgb = read_this(image_file=image_file, gray_scale=gray_scale)
    image_mirror = np.fliplr(image_rgb)
    if with_plot:
        fig = plt.figure(figsize=(10, 20))

        ax1 = fig.add_subplot(2, 2, 1)
        ax1.axis("off")
        ax1.title.set_text('Original')
        ax2 = fig.add_subplot(2, 2, 2)
        ax2.axis("off")
        ax2.title.set_text("Mirrored")

        if not gray_scale:
            ax1.imshow(image_rgb)
            ax2.imshow(image_mirror)
        else:
            ax1.imshow(image_rgb, cmap='gray')
            ax2.imshow(image_mirror, cmap='gray')
        return True
    return image_mirror
The above function returns an image matrix that is reversed or flipped row-wise from left to right.
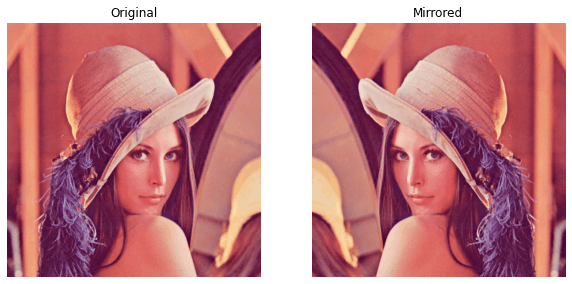
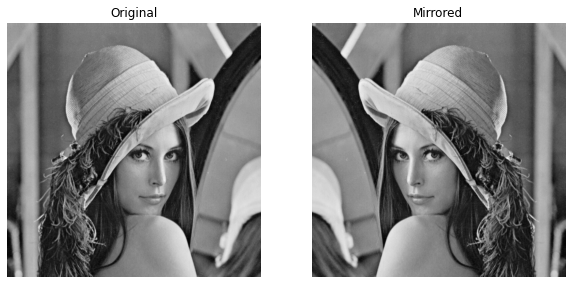
Let's plot the same -
mirror_this(image_file="lena_original.png", with_plot=True)
mirror_this(image_file="lena_original.png", gray_scale=True, with_plot=True)
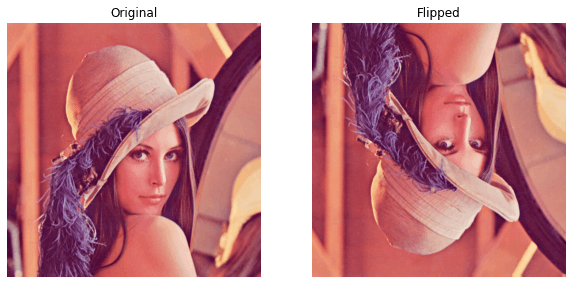
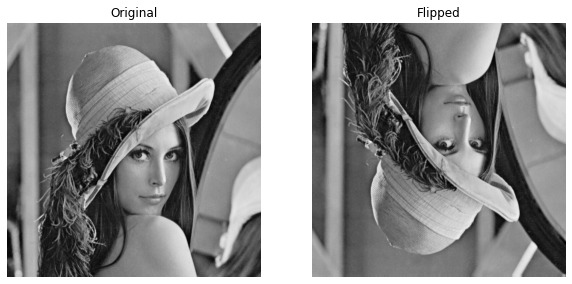
Flipping the Image
To flip the image basically, we need to reverse the matrix column-wise from up to down. For example, let's consider a matrix B.
>>> B = [
       [4, 1, 1],
       [2, 8, 0],
       [3, 8, 1]
]
If we want to flip this matrix (column-wise), then it would be -
>>> import numpy as np
>>> flip_= np.flipud(B)
>>> flip_
[[3, 8, 1],
 [2, 8, 0],
 [4, 1, 1]]
We use NumPy for flipping the matrix in order to maintain the fastness of the code.
def flip_this(image_file, gray_scale=False, with_plot=False):
    image_rgb = read_this(image_file=image_file, gray_scale=gray_scale)
    image_flip = np.flipud(image_rgb)
    if with_plot:
        fig = plt.figure(figsize=(10, 20))

        ax1 = fig.add_subplot(2, 2, 1)
        ax1.axis("off")
        ax1.title.set_text('Original')
        ax2 = fig.add_subplot(2, 2, 2)
        ax2.axis("off")
        ax2.title.set_text("Flipped")

        if not gray_scale:
            ax1.imshow(image_rgb)
            ax2.imshow(image_flip)
        else:
            ax1.imshow(image_rgb, cmap='gray')
            ax2.imshow(image_flip, cmap='gray')
        return True
    return image_flip
The above function returns an image matrix that is reversed or flipped column-wise from up to down.
Let's plot the same -
flip_this(image_file='lena_original.png', with_plot=True)
flip_this(image_file='lena_original.png', gray_scale=True, with_plot=True)
The Complete Code
class ImageOpsFromScratch(object):
    def __init__(self, image_file):
        self.image_file = image_file

    def read_this(self, gray_scale=False):
        image_src = cv2.imread(self.image_file)
        if gray_scale:
            image_rgb = cv2.cvtColor(image_src, cv2.COLOR_BGR2GRAY)
        else:
            image_rgb = cv2.cvtColor(image_src, cv2.COLOR_BGR2RGB)
        return image_rgb

    def mirror_this(self, with_plot=True, gray_scale=False):
        image_rgb = self.read_this(gray_scale=gray_scale)
        image_mirror = np.fliplr(image_rgb)

        if with_plot:
            self.plot_it(orig_matrix=image_rgb, trans_matrix=image_mirror, head_text='Mirrored', gray_scale=gray_scale)
            return None
        return image_mirror

    def flip_this(self, with_plot=True, gray_scale=False):
        image_rgb = self.read_this(gray_scale=gray_scale)
        image_flip = np.flipud(image_rgb)

        if with_plot:
            self.plot_it(orig_matrix=image_rgb, trans_matrix=image_flip, head_text='Flipped', gray_scale=gray_scale)
            return None
        return image_flip

    def plot_it(self, orig_matrix, trans_matrix, head_text, gray_scale=False):
        fig = plt.figure(figsize=(10, 20))

        ax1 = fig.add_subplot(2, 2, 1)
        ax1.axis("off")
        ax1.title.set_text('Original')

        ax2 = fig.add_subplot(2, 2, 2)
        ax2.axis("off")
        ax2.title.set_text(head_text)

        if not gray_scale:
            ax1.imshow(orig_matrix)
            ax2.imshow(trans_matrix)
        else:
            ax1.imshow(orig_matrix, cmap='gray')
            ax2.imshow(trans_matrix, cmap='gray')

        return True
Basic Image Operations Package
imo = ImageOpsFromScratch(image_file='lena_original.png')
### Mirroring ###
imo.mirror_this()
imo.mirror_this(gray_scale=True)
### Flipping ###
imo.flip_this()
imo.flip_this(gray_scale=True)
The above image results will be displayed. Now that everything is sorted we can create other image operations like equalize(), solarize() etc. I have not covered that in this article but definitely in the next one.
What I have gained from this?
- By implementing this, I have learned and understood the logic behind various image operations and how to put that in the form of code.
We can also do the same using a well-known image library Pillow. But, as a developer, we need to know things work from start to end. This is something where everyone should be curious about.
Please do read my another article related to image processing and computer vision where I explain image convolution from scratch.