


Introduction
I have been practicing image processing for quite a little - manipulating the images (image matrices to be precise). In doing so, I got to explore the equalizing methods for images so as to enhance the contrast to a certain extent that the manipulated image looks better than the original image. This technique is termed as Histogram Equalization.
Credits of Cover Image - Photo by Andreas Gücklhorn on Unsplash
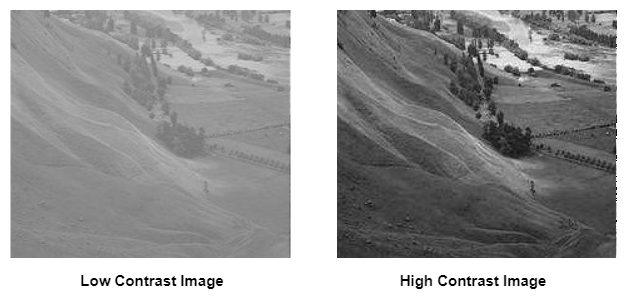
Often times what happens is when the image is captured, it will not be the same as the natural view. In order to meet the level of natural view, post-processing should be done. Hence Histogram Equalization (Normalization) is one of those techniques to enhance the contrast by tweaking the pixel values of the image.
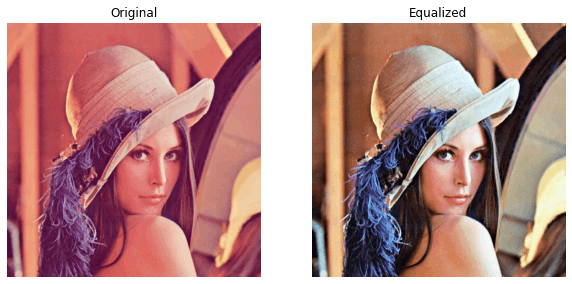
An example can be seen below - original image and equalized image.
If we were to plot the image histograms, it would look something like below -
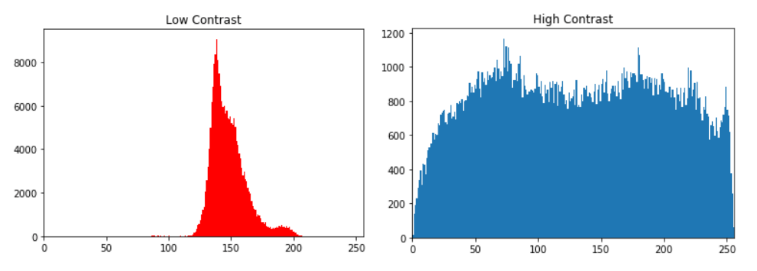
Credits - The above images have been taken from the Internet for showing the examples.
Importance of Histogram Equalization
This method works better for both bright and dark images, especially in the field of medical science there is higher importance in analyzing the X-ray images.
It is also very useful in viewing scientific images like thermal images and satellite images.
Implementation
In this article, I will implement this method both by using the openCV library and from scratch with just NumPy and Matplotlib. Although I would like to do without using NumPy, it would take much time to compute.
Note - For coding from scratch, I will use openCV to read the image and nothing else.
I have taken Lena Image for testing the functions. I have saved the same in my working directory.
Import the Requirements
The packages that we mainly use are:
- NumPy
- Matplotlib
- OpenCV → It is only used for reading the image (in this article).

import cv2
import numpy as np
from matplotlib import pyplot as plt
Read the Image
def read_this(image_file, gray_scale=False):
    image_src = cv2.imread(image_file)
    if gray_scale:
        image_src = cv2.cvtColor(image_src, cv2.COLOR_BGR2GRAY)
    else:
        image_src = cv2.cvtColor(image_src, cv2.COLOR_BGR2RGB)
    return image_src
The above function reads the image either in gray_scale or RGB and returns the image matrix.
Code Implementation with Library
For equalizing, we can simply use the equalizeHist() method available in the library cv2. We have two aspects here -
When the image is read in
RGB.- Separate the pixels based on the color combination. We can use the
split()method available in the librarycv2. - Apply the equalization method for each matrix.
- Merge the equalized image matrices altogether with the method
merge()available in the librarycv2.
- Separate the pixels based on the color combination. We can use the
When the image is read in
gray_scale.- Just apply the equalization method for the image matrix.
Plot the original image and equalized image.
def equalize_this(image_file, with_plot=False, gray_scale=False):
    image_src = read_this(image_file=image_file, gray_scale=gray_scale)
    if not gray_scale:
        r_image, g_image, b_image = cv2.split(image_src)

        r_image_eq = cv2.equalizeHist(r_image)
        g_image_eq = cv2.equalizeHist(g_image)
        b_image_eq = cv2.equalizeHist(b_image)

        image_eq = cv2.merge((r_image_eq, g_image_eq, b_image_eq))
        cmap_val = None
    else:
        image_eq = cv2.equalizeHist(image_src)
        cmap_val = 'gray'

    if with_plot:
        fig = plt.figure(figsize=(10, 20))

        ax1 = fig.add_subplot(2, 2, 1)
        ax1.axis("off")
        ax1.title.set_text('Original')
        ax2 = fig.add_subplot(2, 2, 2)
        ax2.axis("off")
        ax2.title.set_text("Equalized")

        ax1.imshow(image_src, cmap=cmap_val)
        ax2.imshow(image_eq, cmap=cmap_val)
        return True
    return image_eq
Let's test the above function -
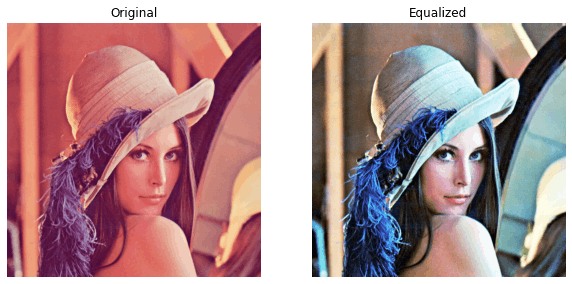
equalize_this(image_file='lena_original.png', with_plot=True)
equalize_this(image_file='lena_original.png', with_plot=True, gray_scale=True)
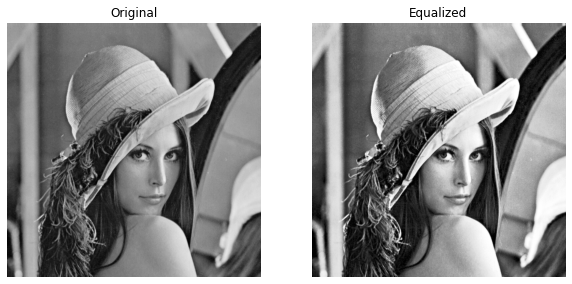
The above plots are clear and we can say that the equalized images look better than the original images. This was implemented using the cv2 library.
Code Implementation from Scratch
For this, I am using NumPy for all the matrix operations. Again we can do it with for loops, but it will take more time to compute. Even here we have two aspects as before -
When the image is read in
RGB.- Separate the pixels based on the color combination. We can slice it down using
NumPyoperations. - Apply the equalization method for each matrix.
- Merge the equalized image matrices altogether with the method
dstack(tup=())available in the libraryNumPy.
- Separate the pixels based on the color combination. We can slice it down using
When the image is read in
gray_scale.- Just apply the equalization method for the image matrix.
Plot the original image and equalized image.
Let's write our own function to compute the image equalization. Image pixel values are normally in the range of 0 to 255. So in total, we will have 256 pixels.
def enhance_contrast(image_matrix, bins=256):
    image_flattened = image_matrix.flatten()
    image_hist = np.zeros(bins)

    # frequency count of each pixel
    for pix in image_matrix:
        image_hist[pix] += 1

    # cummulative sum
    cum_sum = np.cumsum(image_hist)
    norm = (cum_sum - cum_sum.min()) * 255
    # normalization of the pixel values
    n_ = cum_sum.max() - cum_sum.min()
    uniform_norm = norm / n_
    uniform_norm = uniform_norm.astype('int')

    # flat histogram
    image_eq = uniform_norm[image_flattened]
    # reshaping the flattened matrix to its original shape
    image_eq = np.reshape(a=image_eq, newshape=image_matrix.shape)

    return image_eq
Credits - The above code is an inspiration from the article written by Tory Walker.
The above function returns an equalized image matrix when passed the original image matrix as an argument.
Let's write another function that computes the equalization for both the RGB image and the gray_scale image taking the above function in use.
def equalize_this(image_file, with_plot=False, gray_scale=False, bins=256):
    image_src = read_this(image_file=image_file, gray_scale=gray_scale)
    if not gray_scale:
        r_image = image_src[:, :, 0]
        g_image = image_src[:, :, 1]
        b_image = image_src[:, :, 2]

        r_image_eq = enhance_contrast(image_matrix=r_image)
        g_image_eq = enhance_contrast(image_matrix=g_image)
        b_image_eq = enhance_contrast(image_matrix=b_image)

        image_eq = np.dstack(tup=(r_image_eq, g_image_eq, b_image_eq))
        cmap_val = None
    else:
        image_eq = enhance_contrast(image_matrix=image_src)
        cmap_val = 'gray'

    if with_plot:
        fig = plt.figure(figsize=(10, 20))

        ax1 = fig.add_subplot(2, 2, 1)
        ax1.axis("off")
        ax1.title.set_text('Original')
        ax2 = fig.add_subplot(2, 2, 2)
        ax2.axis("off")
        ax2.title.set_text("Equalized")

        ax1.imshow(image_src, cmap=cmap_val)
        ax2.imshow(image_eq, cmap=cmap_val)
        return True
    return image_eq
Let's test the above function -
equalize_this(image_file='lena_original.png', with_plot=True)
equalize_this(image_file='lena_original.png', with_plot=True, gray_scale=True)

The above plots are clear and we can say that the equalized images look better than the original images. This was implemented from scratch using the NumPy library.
Comparison
Let's compare the equalized image obtained from the cv2 library and the equalized image obtained from the code written from scratch.
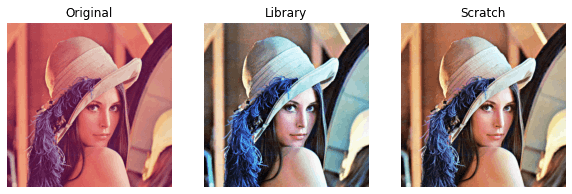
We can notice there is a slight difference between the library image and scratch image. But both seem to be clear when compared with the original image. Here I complete my article with my own takeaway.
Takeaway
Personally, I learned a lot by exploring and implementing different methods applied to increase the image intensity. Especially, trying to implement the code from scratch by both referring and learning.
It is always good to use the library methods as they seem to be more optimized and works 100 percent.
Image processing is a very crucial subject to learn and one really deserves to try out practicing with so much curiosity and ones' own exploration.
Do give a read to my other articles and let me know your thoughts -