


In this article, I will share my experience (the errors and issues) while deploying the app which I developed.
For a while till now, I have been working on my basic image processing app developed in Python using the frameworks and libraries like -
- Dash
- Plotly
- Plotly express
- NumPy &
- OpenCV
- and some other dependencies
Let me explain how the journey of developing this app began.
Credits of Cover Image - Photo by Kelly Sikkema on Unsplash
Idea
First, I didn't have any idea or plan to develop an app (that too for image processing). It is when one of my colleagues asked in our common group -
How do I re-mirror the image in the zoom app? By default, it takes the virtual background image that is already mirrored.
At that point, I really wanted to understand how this mirroring feature works in any image application. I already know the basics of image processing, like - how to read the image, how to convert the image into grayscale - stuff like that. I thought, why don't I try this in Python, in fact mirroring the image is simply reversing the rows of the image matrix (images are considered as matrices with rows and columns).
Implementation
The moment I knew what to do, I searched online. I got the resources that we can easily implement the mirroring operation using the PIL (Pillow) library. I remember I was once told that the NumPy library is mainly used for scientific and complex mathematical calculations. I fixed in my mind that I would only go to use the NumPy library for both mathematical understanding and as well as implementation.
Firstly, I implemented using a regular for loop. I observed that it was taking too much time to compute. Although it was working, I chose the np.fliplr() (flip-left-right) method. I plotted the result after operating and the image is completely mirrored. The same technique I used for flipping the image up to down. The np.flipud() (flip-up-down) method is used.
Likewise, step by step I learned other operations and executed them. Image Flipping and Mirroring with NumPy and OpenCV was the first blog I wrote in the category of image processing.
Blogs that I wrote (order wise)
Image Operations
Image Transformation (Morphological)
- Image Erosion
- Image Dilation
- Other transformations which use the concept of erosion and dilation.
Note - I have re-ordered the blogs in my series, in a way that a beginner can also understand from the initial step.
App Development
After having developed some image operations, I wanted to compile everything together as an app with a proper UI. I have extensively used dash & plotly for designing the UI part along with the user-upload component.
Note - I won't be sharing the whole code but for sure the code snippets.
Package imports
import dash
import dash_core_components as dcc
import dash_html_components as html
import dash_daq as daq
import plotly.express as px

import cv2
import numpy as np
import json
import base64

from matplotlib import pyplot as plt
from dash.dependencies import (Input, Output, State)

from image_ops_scratch import (ImageOperations, read_image_string)
from image_morphs_scratch import MorphologicalTransformations
image_ops_scratch→ the file where all the image operations are defined.image_morphs_scratch→ the file where all the morphological image transformations are defined.
Start the App
external_stylesheets = [
    'https://codepen.io/chriddyp/pen/bWLwgP.css'
]

app = dash.Dash(__name__, external_stylesheets=external_stylesheets)
app.config['suppress_callback_exceptions'] = True
app.title = 'Image Processing App'
server = app.server
Front End
For developing the UI, we shall use the sub-packages of dash namely -
- dash_daq
- dash_core_components
- dash_html_components
- dash.dependencies
Please refer to the official documentation to understand the basics of dash callbacks and other important UI components.
File Upload Component (UI)
This component is used to upload a local file from the system to the application. When the user clicks on this, the file directory pops up to select an appropriate file. Firstly, the image file that we select is read in base64 code which is to be converted into an image array for the operation to work effectively (the operations work only for nd arrays).
html.Div([
    dcc.Upload(
        id='upload-image',
        children=html.Div([
            'Drag and Drop or ',
            html.A('Select Files')
        ]),
        style={
            'width': '100%',
            'height': '70px',
            'lineHeight': '60px',
            'borderWidth': '1px',
            'borderStyle': 'dashed',
            'borderRadius': '5px',
            'textAlign': 'center',
            'margin': '10px',
            'backgroundColor': '#F0F1F1'
        },
        multiple=True
    ),
], style={'paddingTop' : 50})
Convert the String Image to Matrix
def read_image_string(contents):
   encoded_data = contents[0].split(',')[1]
   nparr = np.frombuffer(base64.b64decode(encoded_data), np.uint8)
   img = cv2.imdecode(nparr, cv2.IMREAD_COLOR)
   img = cv2.cvtColor(img, cv2.COLOR_BGR2RGB)
   return img
Toggle Switch (Grayscale mode - on & off)
When the toggle switch is turned on, the image shall be converted directly to grayscale. By default, the image is read in RGB mode.
html.Div([
    daq.ToggleSwitch(
        id='image-mode',
        size=60,
        label='Gray Scale',
        labelPosition='top',
        color='#717171',
        value=False,
    )
], style={'paddingTop' : 30, 'paddingBottom' : 10})
Radio Buttons - Operation / Transformation
To represent each operation we will use radio buttons. When the user selects any particular operation, the output of the image changes and the same is displayed in the app.
image_ops = ['None', 'Equalize', 'Flip', 'Mirror', 'Binarize', 'Invert', 'Solarize']
html.Div([
    dcc.RadioItems(
        id='in-operation',
        options=[{'label' : op, 'value' : op.lower()} for op in image_ops],
        value='none'
    ),
], className='select-operation')

########################

image_morphs = ['None', 'Erode', 'Dilate', 'Open', 'Close', 'Gradient', 'Boundary Extraction']
html.Div([
    html.P('Morph level - '),
    dcc.Input(id='morph-level', type='number', placeholder='Enter Morph Level - ', value=3),
    html.Div([
        dcc.RadioItems(
            id='in-transformation',
            options=[{'label' : tr, 'value' : tr.lower()} for tr in image_morphs],
            value='none'
        ),
    ], style={'paddingTop' : 20})
], className='select-operation')
Tabs to Separate Operations & Transformations
The app should have two tabs so as to separate image operations and image transformations. Also, in the transformations tab, the image needs to be converted into binary as they only work on binary images. Similarly, in the operations tab, we shall place the toggle switch.
tab_style = {
    'borderBottom': '1px solid #d6d6d6',
    'padding': '10px',
    'fontWeight': 'bold'
}

tab_selected_style = {
    'borderTop': '5px solid #d6d6d6',
    'borderBottom': '3px solid #d6d6d6',
    'backgroundColor': '#7E8483',
    'color': 'white',
    'padding': '6px'
}

html.Div([
    dcc.Tabs(
        id='image-processors-tabs',
        value='operators',
        children=[
            dcc.Tab(
                label='Operations',
                value='operators',
                style=tab_style,
                selected_style=tab_selected_style,
                children=[
                    # toggle switch
                    # operations - radio buttons
                ]
            ),
            dcc.Tab(
                label='Transformations',
                value='transformers',
                style=tab_style,
                selected_style=tab_selected_style,
                children=[
                    # transformations - radio buttons
                ]
            )
        ]
    )
], className='tab-div')
Output Image - Component
The output div should be the same for both operations and transformations. It has to be already preserved with a unique id with which it can be updated based on the tab that is selected.
html.Div(
    id='result-in-out-image',
    className='flex-item-right'
)
Back End
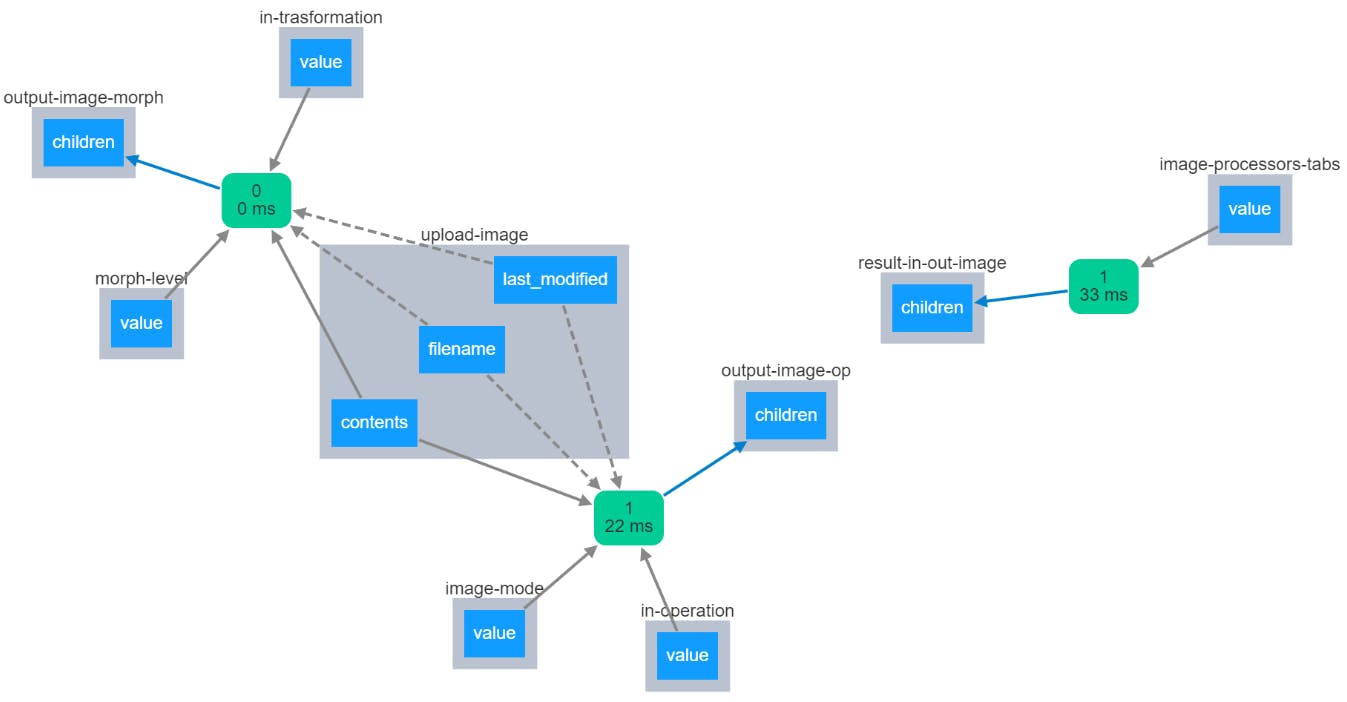
In dash, we mainly have callbacks based on which the output is displayed or updated. Each output callback identified with a unique id can take the n number of Inputs or States. But each callback takes only one output with a unique id that can be repeated exactly once.
The callback chart for this app is as follows -
Convert the String Image to Matrix
def parse_contents(contents, filename, date):
    image_mat = read_image_string(contents=contents)
    return image_mat
Here -
- contents → are the data in the file that is selected
- filename → points to the name of the file that is selected
- date → points to the status to when the file is last updated
Setting the Output Layout Based on the Tab Selected
We have one output div that is reserved. Based on the tab selected, the app should change its nature. Hence, the following code.
@app.callback(
    Output('result-in-out-image', 'children'),
    [Input('image-processors-tabs', 'value')]
)
def set_output_layout(which_tab):
    if which_tab == 'operators':
        in_out_image_div = html.Div([
            html.Div(
                children= [
                    html.H5('Image Used - Output'),
                    html.Div(id='output-image-op'),
                ],
                style={'textAlign' : 'center', 'paddingTop' : 50}
            )
        ])

    elif which_tab == 'transformers':
        in_out_image_div = html.Div([
            html.Div(
                children= [
                    html.H5('Image Used - Output'),
                    html.Div(id='output-image-morph'),
                ],
                style={'textAlign' : 'center', 'paddingTop' : 50}
            )
        ])

    return in_out_image_div
Image Operations - Back End
In this, we have -
- 1 Output
output-image-op→ pointing to the change in children (HTML collection)
- 3 Inputs
upload-image→ pointing to the contents of the fileimage-mode→ pointing to the mode (RGB or grayscale by toggle switch)in-operation→ pointing to the input operation that is selected
- 2 States
upload-image→ pointing to the state of the file nameupload-image→ pointing to the state of the date (when the file is last modified)
@app.callback(
    Output('output-image-op', 'children'),
    [
        Input('upload-image', 'contents'),
        Input('image-mode', 'value'),
        Input('in-operation', 'value'),
        # -------
        State('upload-image', 'filename'),
        State('upload-image', 'last_modified'),
    ]
)
def get_operated_image(contents, image_mode, operation, filenames, dates):
    if contents is not None:
        imsrc = parse_contents(contents, filenames, dates)
        imo = ImageOperations(image_file_src=imsrc)
        if (operation == 'equalize'):
            out_img = imo.equalize_this(gray_scale=True) if image_mode else imo.equalize_this()
        elif (operation == 'flip'):
            out_img = imo.flip_this(gray_scale=True) if image_mode else imo.flip_this()
        elif (operation == 'mirror'):
            out_img = imo.mirror_this(gray_scale=True) if image_mode else imo.mirror_this()
        elif (operation == 'binarize'):
            out_img = imo.binarize_this(gray_scale=True) if image_mode else imo.binarize_this()
        elif (operation == 'invert'):
            out_img = imo.invert_this(gray_scale=True) if image_mode else imo.invert_this()
        elif (operation == 'solarize'):
            out_img = imo.solarize_this(gray_scale=True) if image_mode else imo.solarize_this()
        else:
            out_img = imo.read_this(gray_scale=True) if image_mode else imo.read_this()

        out_image_fig = px.imshow(out_img, color_continuous_scale='gray') if image_mode else px.imshow(out_img)
        out_image_fig.update_layout(
            coloraxis_showscale=False,
            width=600, height=400,
            margin=dict(l=0, r=0, b=0, t=0)
        )
        out_image_fig.update_xaxes(showticklabels=False)
        out_image_fig.update_yaxes(showticklabels=False)

        output_result = html.Div([
            dcc.Graph(id='out-op-img', figure=out_image_fig)
        ], style={'paddingTop' : 50})

        return output_result
Image Transformation - Back End
In this, we have -
- 1 Output
output-image-morph→ pointing to the change in children (HTML collection)
- 3 Inputs
upload-image→ pointing to the contents of the filemorph-level→ pointing to the input value with which the level of the structuring element is decidedin-transformation→ pointing to the input transformation that is selected
- 2 States
upload-image→ pointing to the state of the file nameupload-image→ pointing to the state of the date (when the file is last modified)
@app.callback(
    Output('output-image-morph', 'children'),
    [
        Input('upload-image', 'contents'),
        Input('morph-level', 'value'),
        Input('in-transformation', 'value'),
        # -------
        State('upload-image', 'filename'),
        State('upload-image', 'last_modified'),
    ]
)
def get_transformed_image(contents, level, transformation, filenames, dates):
    if contents is not None:
        imsrc = parse_contents(contents, filenames, dates)
        morph = MorphologicalTransformations(image_file_src=imsrc, level=level)
        level = 3 if level == None else level
        image_src = morph.read_this()

        if (transformation == 'erode'):
            out_img = morph.erode_image(image_src=image_src)
        elif (transformation == 'dilate'):
            out_img = morph.dilate_image(image_src=image_src)
        elif (transformation == 'open'):
            out_img = morph.open_image(image_src=image_src)
        elif (transformation == 'close'):
            out_img = morph.close_image(image_src=image_src)
        elif (transformation == 'gradient'):
            out_img = morph.morph_gradient(image_src=image_src)
        elif (transformation == 'boundary extraction'):
            out_img = morph.extract_boundary(image_src=image_src)
        else:
            out_img = image_src

        out_image_fig = px.imshow(out_img, color_continuous_scale='gray')
        out_image_fig.update_layout(
            coloraxis_showscale=False,
            width=600, height=400,
            margin=dict(l=0, r=0, b=0, t=0)
        )
        out_image_fig.update_xaxes(showticklabels=False)
        out_image_fig.update_yaxes(showticklabels=False)

        output_result = html.Div([
            dcc.Graph(id='out-morph-img', figure=out_image_fig)
        ], style={'paddingTop' : 50})

        return output_result
Note - The above code snippets belong to one file i.e., app.py. The actual image processing code is not disclosed. One can look it up in my GitHub repository.
Deployment
The fun part was during the deployment. Although I have experience in deploying Python web apps on Heroku, I faced slight issues (which helped me learn) while deploying this app. I organized all the code and checked if there is any change that needed to be done.
Folder Structure
- image-app/
    - assets/
    -     custom_style.css
    - images/
    -     lena_original.png
    -     pinktree.jpg
    -     scenary.jpg
    - .gitignore
    - app.py
    - image_morphs_scratch.py
    - image_ops_scratch.py
    - Procfile
    - requirements.txt
I specified all the requirements in a separate requirements.txt file. The errors occurred during the installation of OpenCV inside Heroku. Actually, I was supposed to specify opencv-contrib-python-headless instead of opencv-contrib-python to get the package installed properly.
requirements.txt
dash
plotly
dash-core-components
dash-html-components
dash-daq
numpy
matplotlib
pandas
opencv-contrib-python-headless
gunicorn
Procfile
web: gunicorn app:server
Everything is set now, We can easily follow these steps and deploy the app that can be accessible to everyone.
That's It, Folks
By developing this app, I got to learn some image processing concepts along with the mathematics behind it. I feel happy to finally be able to deploy this app on Heroku. I know the app is sort of basic and will be adding other interesting features to it in the future. I would like to see your feedback or suggestions in the comments.
- GitHub link → github.com/msameeruddin/image-app
- App link → process-image-app.herokuapp.com
If you have liked this project, do drop a star, and buy coffee for me from here. We will meet in the next blog.